> For the complete documentation index, see [llms.txt](https://knowledgebase.autorabit.com/llms.txt). Markdown versions of documentation pages are available by appending `.md` to page URLs; this page is available as [Markdown](https://knowledgebase.autorabit.com/product-guides/arm-1/getting-started-1/arm-administration/subscription-management.md).
# Subscriptions
{% hint style="info" %}
**Important Notes**:
Only the **Registered User** and **Team Admins** can view the **Subscription Management** page.
{% endhint %}
## Subscription Management: Overview
ARM offers an easy and centralized solution for a **Registered User** of your organization to manage team subscriptions and accounts. This ensures tracking of all subscription activity, making sure everything is logged. You use the **Subscription Management (SM)** interface to review and manage how purchased subscriptions are used on your production instance.
### Procedure
1. Log in to your ARM account using the **Registered User/ADMIN** credentials.
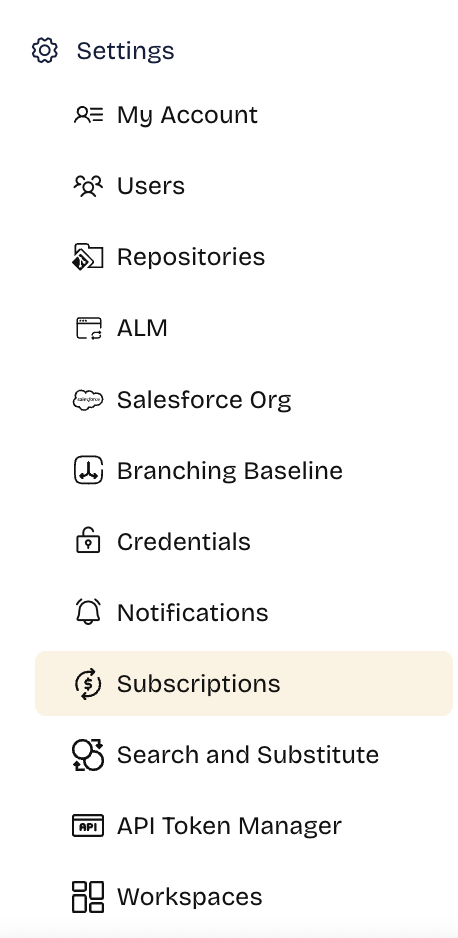
2. Hover your mouse over the **`Settings`** tab and click on **`Subscriptions`**.
3. Your active plan details will be shown on the dashboard with details like:
* **`Total Subscriptions:`** Number of licenses purchased by the organization. Only the Registered User/ADMIN of your organization can view the Subscription Management section.
* **`Total Subscription Allotted:`** Number of licenses utilized to date.
* **`Total Subscription Available:`** Total number of licenses available.\
{% hint style="info" %}
**Important Note**: By default, ARM considers you as part of a team, and if the subscription available denotes 'zero', it means you completely utilize the entire team subscription for your team only.
{% endhint %}
### Adding and Configuring Teams
{% hint style="info" %}
**The Create Team option will not be visible for customers with fewer than 20 licenses.**
{% endhint %}
This section is about creating the teams and assigning members to those teams. This allows you to assign tasks to specific groups of people in your organization.
1. Log in to the **`Subscription Management`** dashboard using the Registered User credential.
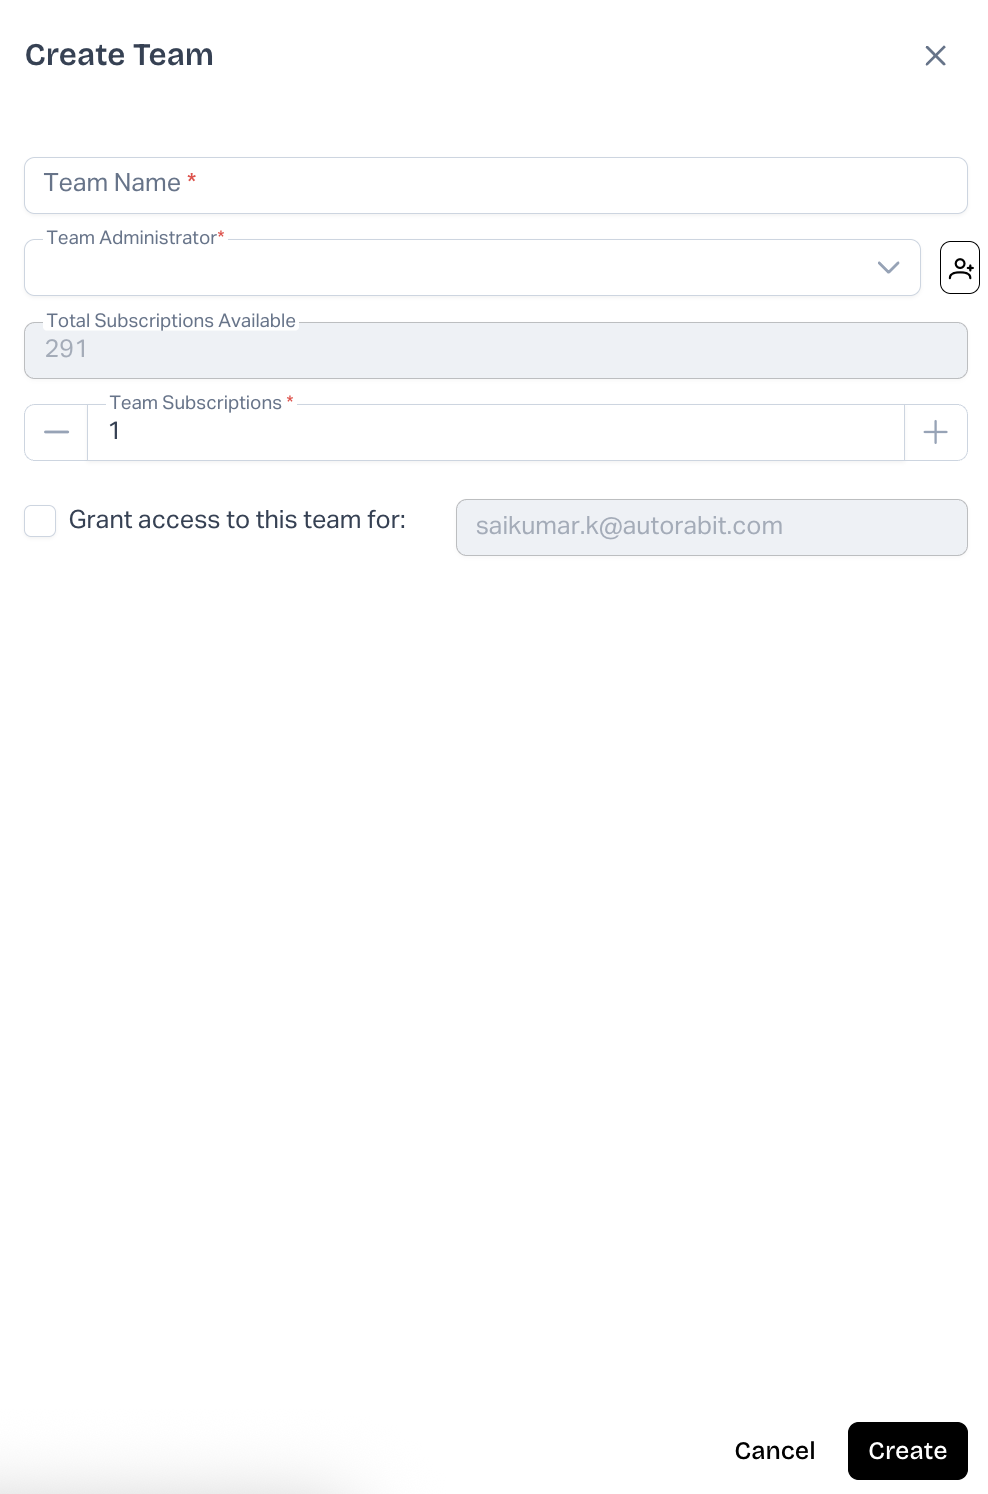
2. On the right side of the screen, click **`Create Team`**.
3. Enter a **name** for your team.
4. Choose a **`Team Administrator`** or click on theicon to create a user account and assign them permission as a Team Administrator. Fill in the required details; the newly created user will be assigned as a Team Administrator.
{% hint style="info" %}
**Important Notes**:
* Only the **delegated** or **released users** list will be displayed in the **Team Administrator** dropdown field. For more information on delegated or released users, please refer [HERE](/product-guides/arm/arm-administration/user-management/delegate-approvals-to-another-user.md).
* **Users** assigned to a team are **not** allowed to join another **team**.
{% endhint %}
5. Next, enter the number of licenses required in the **`Team Subscriptions`** field.
6. If you would like to add the current logged-in registered user as part of the team, select the checkbox: **`Grant access to this team for`**
{% hint style="info" %}
**Important Note**: The granted user will not be counted as a part of the subscribed licenses on the team.
{% endhint %}
7. Click **`Save`**.
8. The newly created team will be displayed on the **`Subscription Management`** home page.
9. For each team created, the following information is displayed:
* **`Team Name:`** Name of the Team
* **`Created Date:`** Date/time stamp for the team created
* **`Team Admin:`** Team Administrator assigned to the current team
* **`Subs. Allotted:`** Number of licenses allotted to the team
* **`Subs. Consumed:`** Number of licenses consumed
* **`Subs. Available:`** Number of licenses pending
10. Additional options:
* **`Add New Resource:`** Click on thesymbol to add new resources to the team. The team administrator can create users with their login. However, if you need to add resources from the existing login, follow the steps mentioned in the Delegate [Users](/product-guides/arm-1/getting-started-1/arm-administration/user-management/delegate-approvals-to-another-user.md) section.
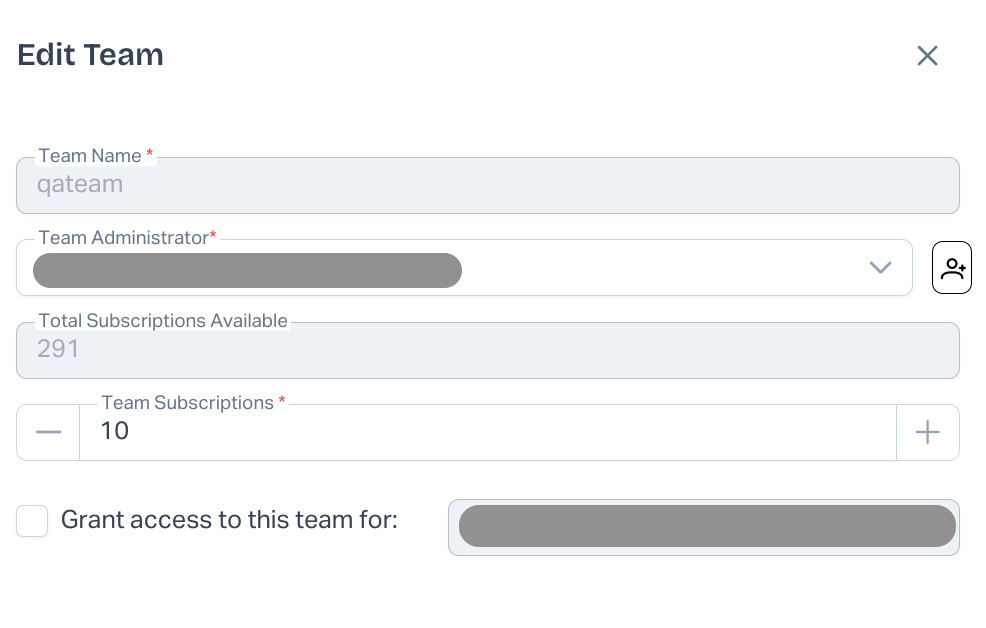
* **`Edit Team:`** Click on theicon to modify the team details, like assigning a new team administrator, changing the subscription licenses, etc.
* **`Delete a Team:`** Click on theicon to delete the team. This process cannot be undone.
{% hint style="info" %}
**Important Note:** If the current **Team Administrator** is replaced with another **Team Administrator**, then the **entire permissions** that the current administrator holds will be delegated to the new **administrator**.
{% endhint %}
## Managing Licenses for Enterprise Users
As an *Account Administrator* for your ARM account, you can manage the user licenses you have subscribed to for your organization.
#### Purchase Additional User Licenses
You must submit a support ticket to purchase extra licenses for your organization. Our Customer Success (CS) team will provide you with a new license key, which you must upload to the **Subscription Management** page.
**Step 1: Upload License Key**
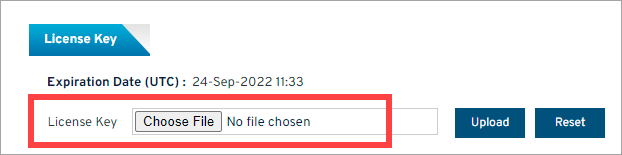
Navigate to **`Admin > Subscription Management`** once you've received the license key file from us. You'll see a summary of the *Total Subscription* count, *Total Subscription Allotted* so far, and *Total Subscription Available* (which can be assigned to a user or team).
Click on **`Choose File`** and upload the **`license key`** (.l4j file format). Click **`Upload`**.
The total subscription counts will be changed based on the user's license specified in the key.
ErrorIf an incorrect file is selected, a notification popup stating that the file is incorrect is displayed. Click on the **Reset** button and select the correct file.
**Step 2: Updating Allotted Subscriptions**
After uploading the license key, the administrator can allot the available subscriptions to the desired team.
1. Look for the desired team on the **Subscription Management** page.
2. Then, under the **`Actions`** tab, click on the **Edit (****)** icon to update the subscription count for a team.
3. The number of user licenses available for your account is displayed in the **`Subscriptions Available`** field.
4. In the **`Team Subscriptions`** section, click on the **`-`** or **`+`** buttons to update the license count, then click **`Update`**.\
All fields on the **Subscription Management** page will get updated.
## Managing License Reductions During Subscription Renewals
### **Overview**
When a subscription is renewed with a lower license count than the number of currently assigned users, the license reduction cannot be completed automatically.
This is because AutoRABIT cannot determine which users should retain access and which users should be removed from the subscription.
To avoid unintentionally revoking access for active users, customers must review and adjust their user assignments before the license reduction can be applied.
### **Example Scenario**
Current license allocation: **12 licenses**
Current assigned users: **12 users**
Renewal purchase: **10 licenses**
In this scenario, the subscription cannot be reduced from 12 licenses to 10 licenses while all 12 licenses remain assigned.
The customer must first identify which 2 users no longer require access and remove or unassign those users.
### **Why Customer Action Is Required**
User access decisions are customer-specific and may depend on:
* Employee roles and responsibilities
* Active projects
* Team assignments
* Organizational access requirements
AutoRABIT Support and Operations teams do not have visibility into which users should be removed and therefore cannot make this decision on behalf of the customer.
### **How to Delete a User**
1. Sign in with an administrator account.
2. Navigate to Settings › Users.
3. Locate the user you want to modify
4. Delete User – Select the User and click on Delete Selected and Confirm the pop up icon to erase the account permanently.
5. Confirm the action by clicking OK in the dialog.
### **What Happens Next?**
* The license reduction can be completed without impacting the remaining assigned users.
* Active users who remain assigned will retain uninterrupted access to ARM.
* Removed users will no longer consume a license.
* The organization will be aligned with its renewed subscription entitlement.
* Future user assignments will be limited by the newly purchased license count.
***
## FAQ's
### Why does my account show the outdated subscription list rather than the amended count list?
Update the total subscription allotted on your account. To do so, go to the **Admin > Subscriptions Management** section and update the **Subs. Allotted** and **Sub. Consumed** count.
---
# Agent Instructions
This documentation is published with GitBook. GitBook is the documentation platform designed so that both humans and AI agents can read, navigate, and reason over technical content effectively. Learn more at gitbook.com.
## Querying This Documentation
If you need additional information that is not directly available in this page, you can query the documentation by asking a question.
Perform an HTTP GET request on the following URL with the `ask` and `goal` query parameters:
```
GET https://knowledgebase.autorabit.com/product-guides/arm-1/getting-started-1/arm-administration/subscription-management.md?ask=&goal=
```
`ask` is the immediate question: it should be specific, self-contained, and written in natural language.
`goal` is what the user is ultimately trying to achieve, the reason they need the answer. Sharing it helps GitBook give you a better, more relevant answer. A goal is most helpful when it describes the outcome the user wants rather than restating the question. For example, with `ask=how do I create an API token`, a goal like `automate deployments from our CI pipeline` lets GitBook tailor the answer to that use case.
The response will contain a direct answer to the question and relevant excerpts and sources from the documentation.
Use this mechanism when the answer is not explicitly present in the current page, you need clarification or additional context, or you want to retrieve related documentation sections.