> For the complete documentation index, see [llms.txt](https://knowledgebase.autorabit.com/llms.txt). Markdown versions of documentation pages are available by appending `.md` to page URLs; this page is available as [Markdown](https://knowledgebase.autorabit.com/product-guides/arm/registration/version-control-repository/git-integration.md).
# GIT Integration
### What is GIT?
**Git** is an extremely popular version control system that is at the heart of a wide variety of high-profile projects. Git is installed and maintained on your local system (rather than in the cloud), giving you a self-contained record of your ongoing programming versions.
"*Simply put, Git is a version control system that lets you manage and keep track of your source code history*."
### What Is GitHub?
GitHub is designed as a Git repository hosting service. It lets you track and share your Git version control projects outside your local computer/server. Unlike Git, GitHub is exclusively cloud-based.
### Prerequisites for registering GIT with ARM
Before registering Git with ARM, you must check off some of the boxes on the prerequisites list.
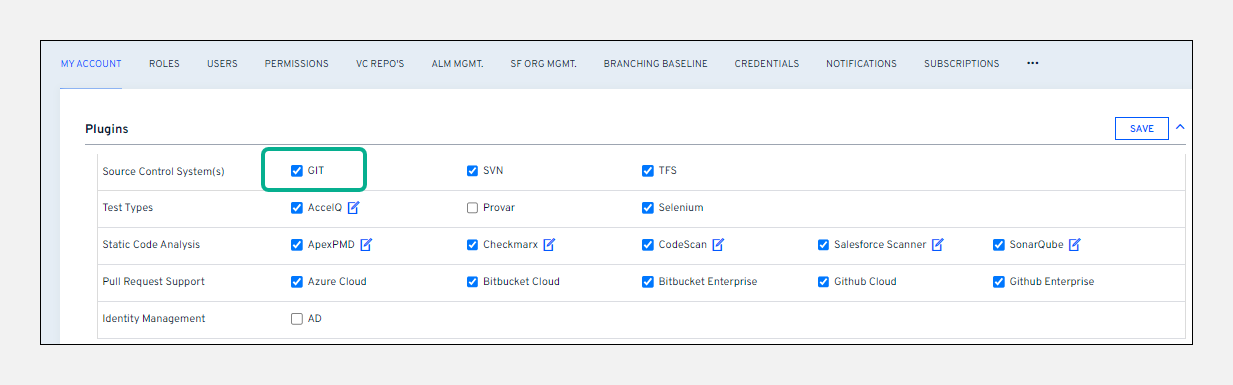
1. Ensure you enable the **`GIT`** plugin under **`Plugins`** in the **`My Account`** section to use GIT for version control.
2. You must have a GitHub account. If you don’t already have a GitHub account, you can create one at [github.com](https://github.com/). Once you have a GitHub account, you can create a new repository or use an existing one.
3. You must have permission to register a repository.
4. Store your GIT credentials in ARM.
### Store your GIT credential in ARM
This is an initial step in storing your user's credentials (usually a username, password, or token) in ARM. GitHub no longer supports basic authentication using a username and password. You must now authenticate to GitHub personal access token. For more information, see the [blog](https://developer.github.com/changes/2019-11-05-deprecated-passwords-and-authorizations-api/) post.
1. Log in to your ARM account.
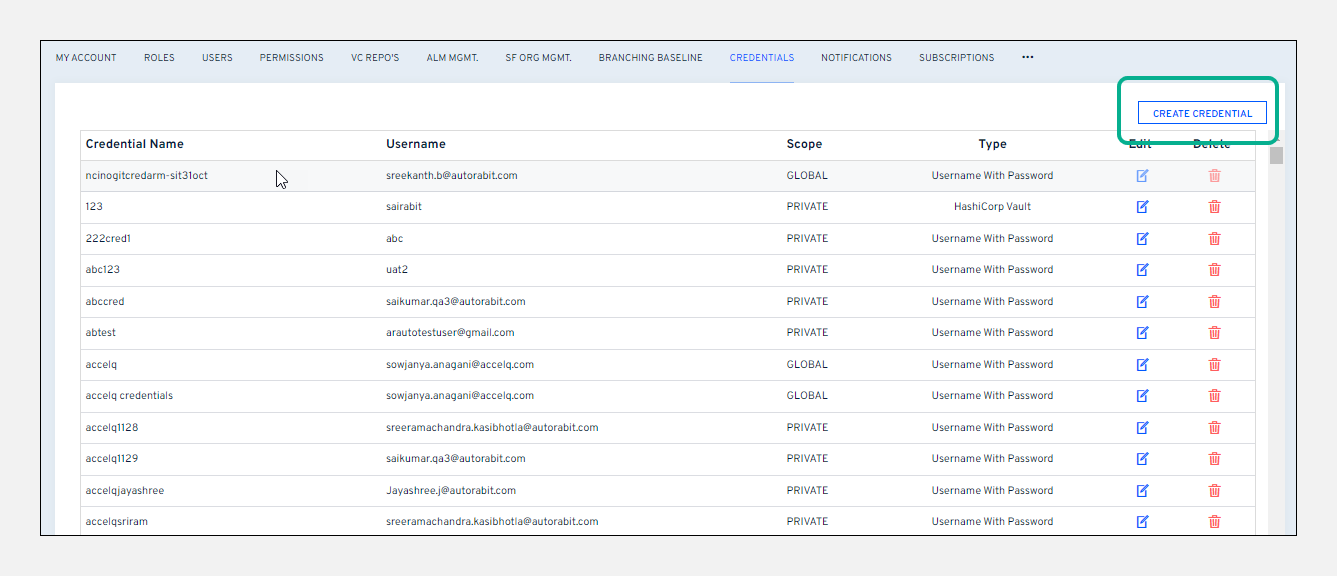
2. Hover your mouse over the **`Admin`** module and click on the **`Credentials`** tab.
3. Next, click on **`Create Credential`** from the right navigation bar.
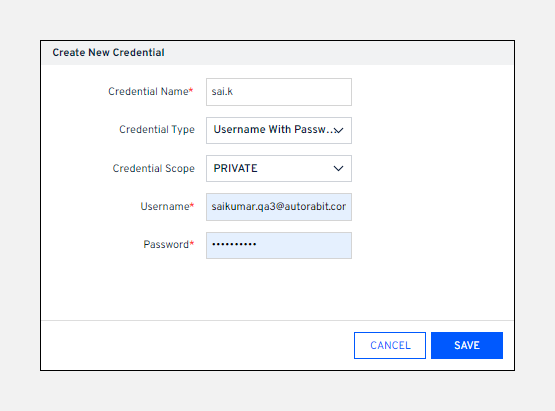
4. On the next pop-up screen, give a **`Credential name`**.
5. Choose the **`Credential Type`** as **`Username With Password.`**
6. Enter your GitHub **`Username`** and **API Token** (in the **`Password`** field), and we will store this encrypted. GitHub no longer supports basic authentication using passwords. You must now authenticate to GitHub with an API token instead. For more information on how to create an API token, see the **Troubleshooting** section on this page.
7. Click **`Save`**.
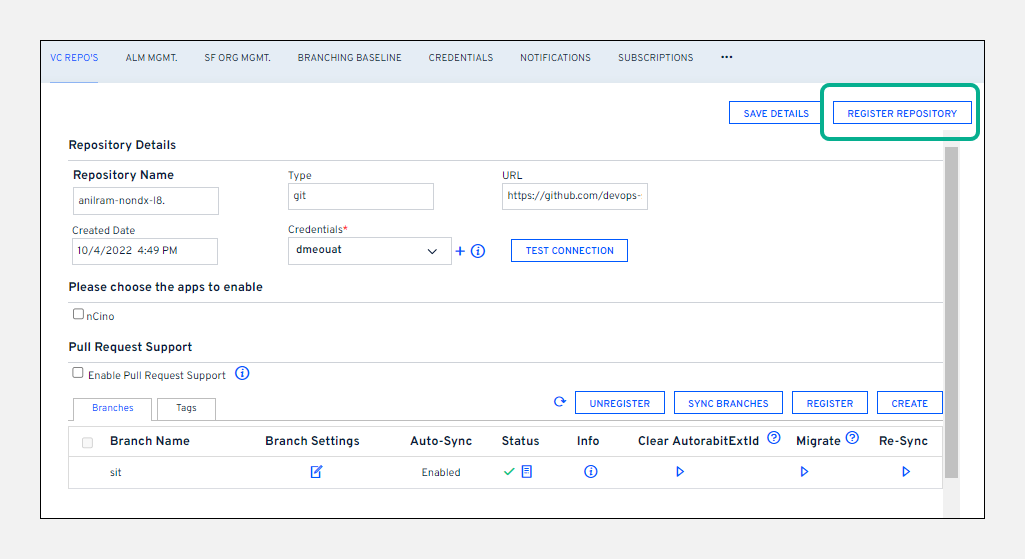
### Registering a GIT repository in ARM
To set up a GIT repository, ensure an account is created and configured at [GIT](https://github.com/). Next, follow the below steps:
1. Log in to your ARM account.
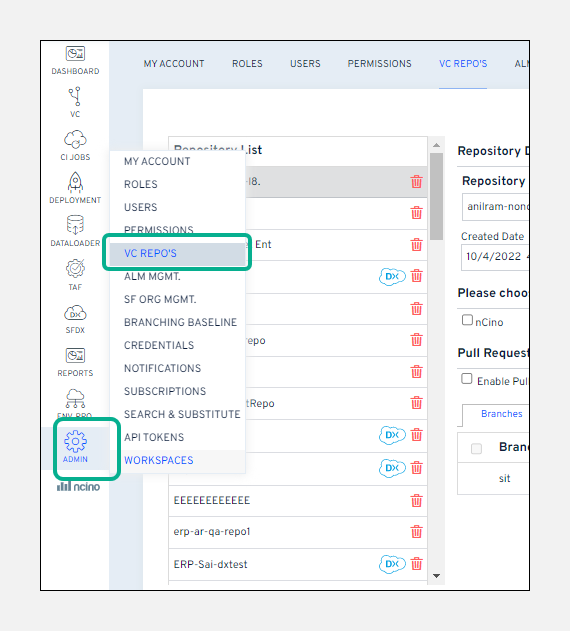
2. Hover your mouse over the **`Admin`** module and click on **`VC Repo's`**.
3. Click on **`Register Repository`**.
4. Select the **`Version Control System`** as **`GIT`** on the **`Register Repository`** page.
5. Select the **AWS CodeCommit Repository** checkbox. ARM fetches data from the repository if the GIT gets hosted on **AWS (Amazon Web Services)**.
6. Enter the name of the repository to display it locally.
7. Paste the **`Repository URL`** that Git provides you.
8. Choose the correct user's **`Credentials`** from the list. To create new credentials, click on the **`+`**icon.Note:Click **Test Connection** to check if the connection has been authenticated or not. A success message is displayed after the authentication is completed.
9. The **`Default Branch`** selection will be in disabled mode by default. Click the icon to fetch and list all the available branches on your remote repository.
10. Select one of the default branches from the list.Note:Ensure the default branch is available in your remote repository with some files committed to it. If no file is available, create a README.txt file and add it to the repository.
11. Once the registration is done, you can find the newly added repository on **`VC Repo's`** home page.
Points to Remember:
1. Select the **`Enable SFDX`** checkbox to register your GIT repository in the SFDX structure.
2. Select the **`Enable nCino`** checkbox to register the GIT repository with nCino objects included. To quickly identify nCino registered Version Control Repositories among all other repositories, nCino logos are marked in front of the Repository Label.
3. The user can enable their Version Control Repository with **SFDX** or **nCino** enabled. Both cannot be enabled at the same time.
### Troubleshooting
While registering GIT with ARM, GIT fails to connect, resulting in *Authenticate Failure***.** This is because GitHub no longer supports basic username and password authentication. You must now authenticate to GitHub personal access token, depending on what you need to do with the token. For more information, see the [blog](https://developer.github.com/changes/2019-11-05-deprecated-passwords-and-authorizations-api/) post.
#### Creating a Personal Access Token
This section guides you through creating your personal access token directly on GitHub.
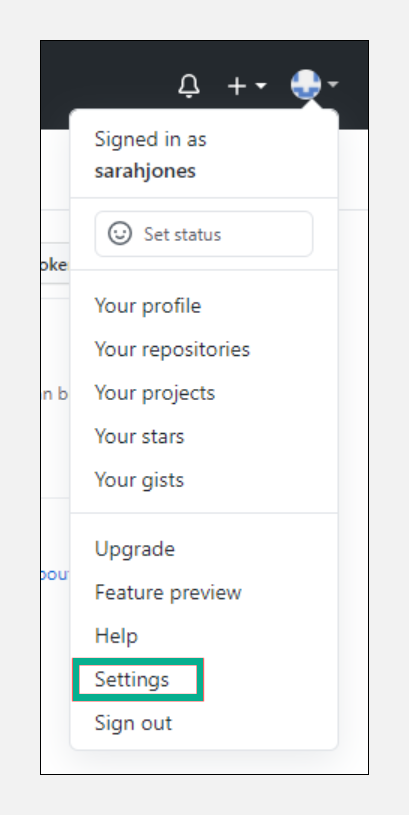
1. Log in to your GitHub account.
2. In the upper-right corner of any page, click your profile photo, then click **`Settings`**.
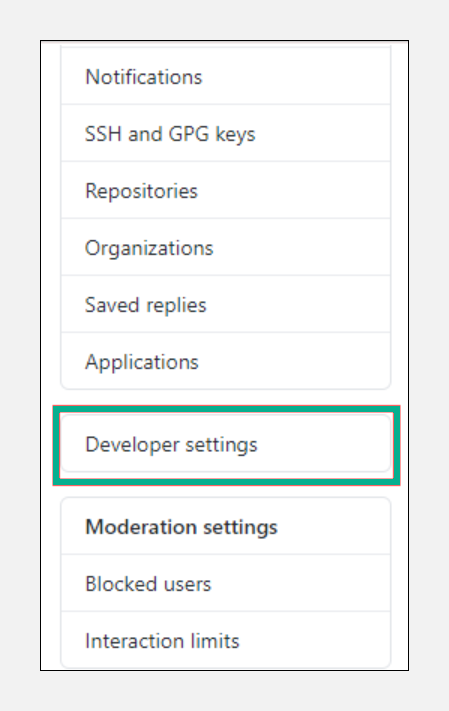
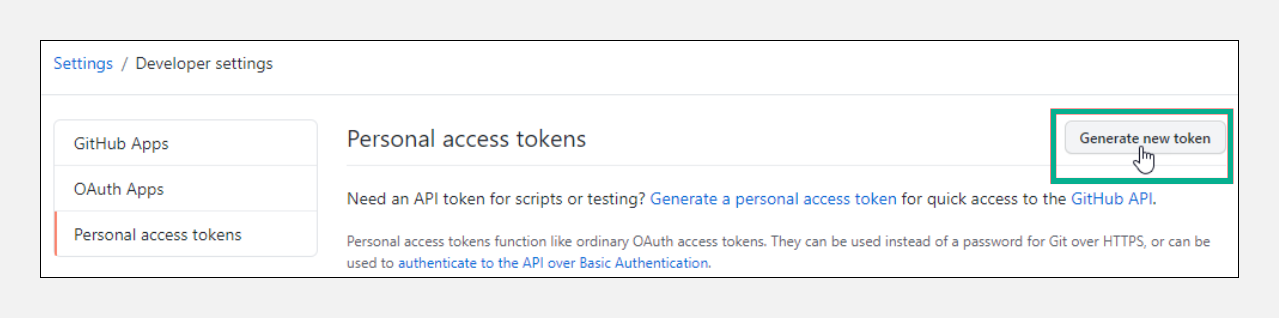
3. In the left sidebar, click **`Developer settings`**.
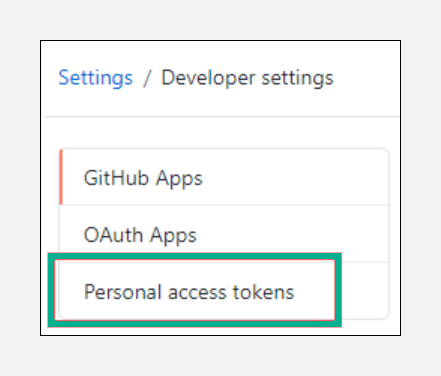
4. In the left sidebar, click **`Personal access tokens`**.
5. Click **`Generate new token`**.
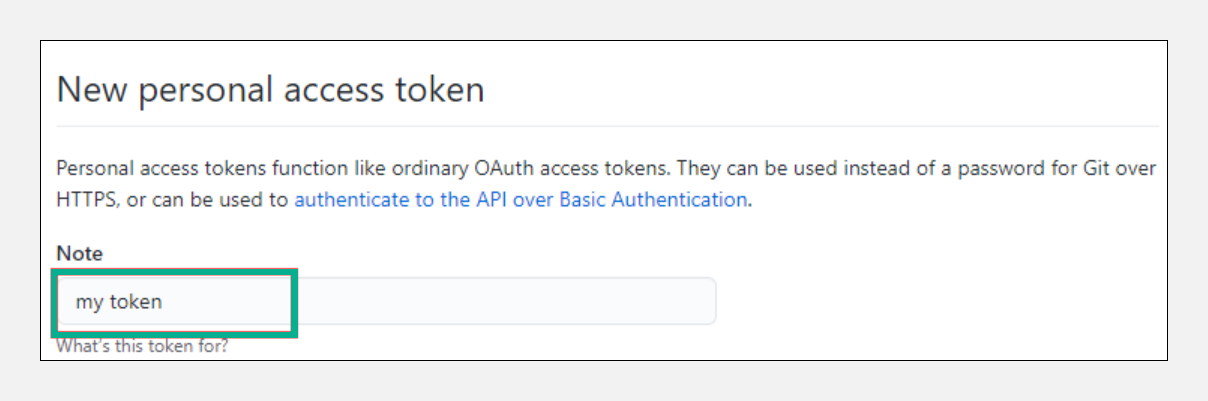
6. Give your token a descriptive name.
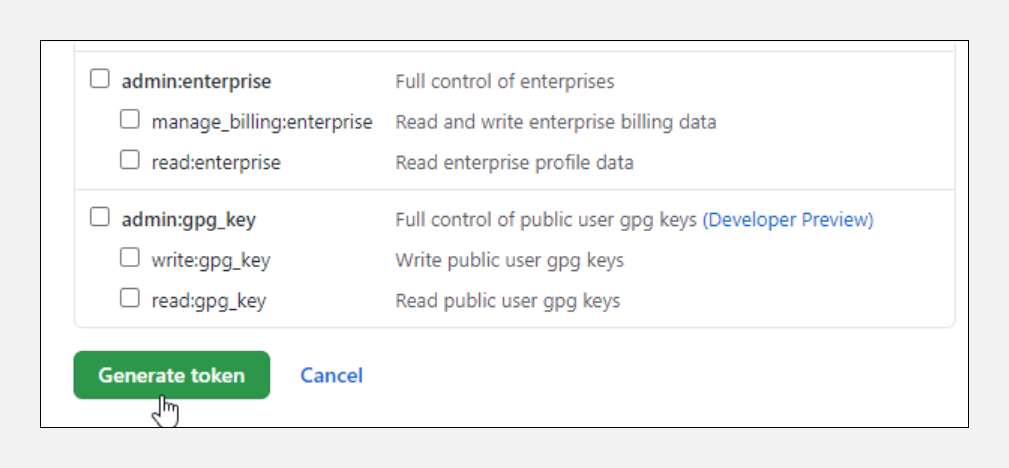
7. Select the scopes or permissions you want to grant this token. Select **`repo`** to use your token to access repositories from the command line.
8. Click **`Generate token`**.
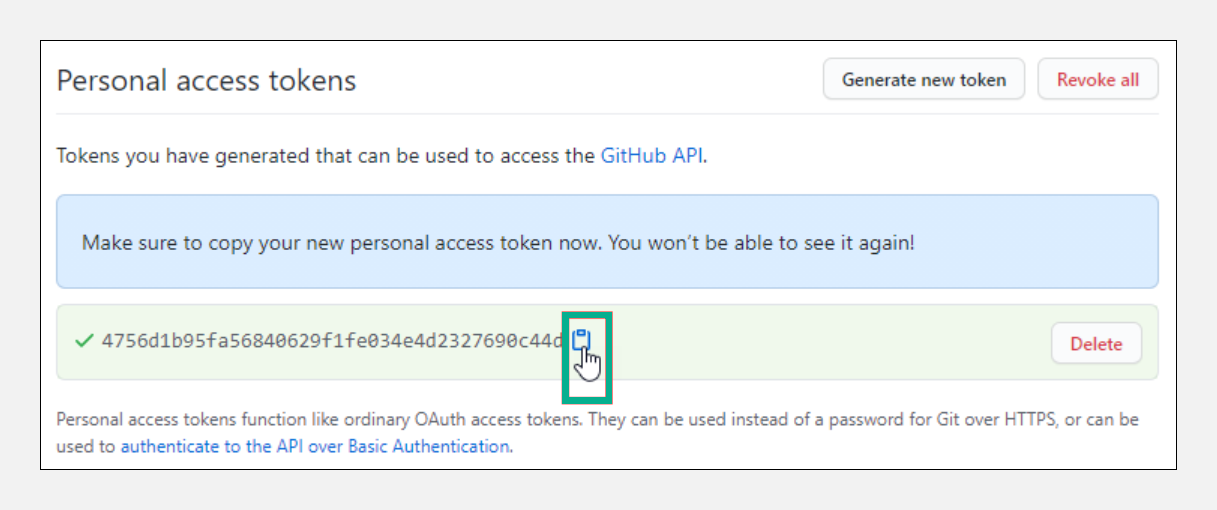
9. Click  to copy the token to your clipboard. You cannot see the token again after navigating off the page for security reasons.
10. Use the copied token as a password for creating/updating the credential in ARM.
11. Once updated, please use the same credential to authenticate the GIT.Important Note:Treat your tokens like passwords and keep them secret. When working with the API, use tokens as environment variables instead of hardcoding them into your programs.
---
# Agent Instructions
This documentation is published with GitBook. GitBook is the documentation platform designed so that both humans and AI agents can read, navigate, and reason over technical content effectively. Learn more at gitbook.com.
## Querying This Documentation
If you need additional information that is not directly available in this page, you can query the documentation dynamically by asking a question.
Perform an HTTP GET request on the current page URL with the `ask` query parameter, and the optional `goal` query parameter:
```
GET https://knowledgebase.autorabit.com/product-guides/arm/registration/version-control-repository/git-integration.md?ask=&goal=
```
`ask` is the immediate question: it should be specific, self-contained, and written in natural language.
`goal` is optional and describes the broader end goal you are ultimately trying to accomplish on behalf of the user. GitBook uses it to tailor the answer towards what is most useful for that goal.
The response will contain a direct answer to the question and relevant excerpts and sources from the documentation.
Use this mechanism when the answer is not explicitly present in the current page, you need clarification or additional context, or you want to retrieve related documentation sections.