> For the complete documentation index, see [llms.txt](https://knowledgebase.autorabit.com/llms.txt). Markdown versions of documentation pages are available by appending `.md` to page URLs; this page is available as [Markdown](https://knowledgebase.autorabit.com/product-guides/vault/configuring-vault/registering-salesforce-org/setup-backup-configuration-for-salesforce-org.md).
# Set up backup configuration for Salesforce Org
## Overview
Backup configuration in AutoRABIT Vault enables you to create snapshots of your Salesforce Org’s data and metadata. These backups can be full or incremental:
* **Full Backup**: Captures all data and metadata.
* **Incremental Backup**: Captures only data/metadata changed since the last backup.
Backups can be scheduled to run **daily**, **weekly**, **monthly**, or at a **custom interval**.
## Prerequisite
* Ensure your Salesforce Org is registered with AutoRABIT Vault.\
[Learn More](/product-guides/vault/configuring-vault/registering-salesforce-org.md)
## How to Set Up a Backup Configuration
1. After registering a Salesforce Org, navigate to the **`Configs`** tab and select **`Add Backup Config`**. If needed, navigate manually via **`Setup`** > your Salesforce Org > **`Configs`** > **`Add Backup Config`**.
2. Choose a configuration type:
* **Metadata and data excluding special objects**
* **Special objects (history, audit logs, KAV, etc.)**
3. Select metadata types from the list to include in the backup.\
Click **`Next`**.
4. On the **Data** tab, you can:
* Filter objects
* Include associated records
* Apply timestamp-based filtering
5. Click a data object (e.g., **Account**) to view and manage its related fields.\
Exclude any fields as needed.
6. Select specific members and click **`Save`**.
7. Return to the object list and confirm updates.
8. To exclude formula fields, enable **`Excluded Formula Fields`**.
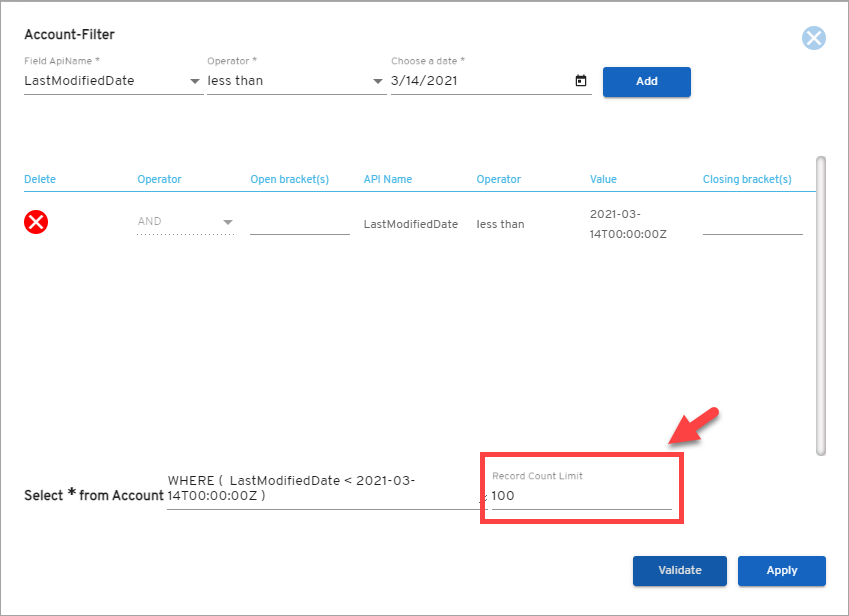
9. Use the **Filter** icon to define label-based rules.
10. Use **Record Count Limit** to limit record extraction and validate the filter.
11. Click **`Apply`** to confirm filter settings.
12. Click **`Next`** to move to the **Scheduling** screen.
## Scheduling Backup
1. Provide a **name** and **description** for the backup.
2. Configure Backup Settings:
* **Bulk API for Data** (serial or parallel)
* **Batch Size** for Metadata (max 10,000 records)
3. Choose **Backup Type**:
* **Full Backup**
* **Incremental Backup**
4. Set **Email Notification** recipients.
5. Enable or disable **Allow multiple backups to run in parallel**.
6. Define **Backup Frequency** (e.g., every 4 hours via **Specific**).
7. Set the **Backup Retention Period**.
8. Click **`Save Config`**.
9. Review summary of selected metadata/data and backup plan.
10. Click **`Save`**. A success message confirms configuration.
11. You are redirected to the **Configs** tab. Your new configuration will appear at the top.
### Additional Options
* **Schedule Toggle**: Temporarily enable/disable backup schedule.
* **Backup Config Details**: View selected metadata/data.
* **Edit/Delete**: Modify or remove the configuration.
* **Last Backup Status**: Displays most recent backup result.
---
# Agent Instructions
This documentation is published with GitBook. GitBook is the documentation platform designed so that both humans and AI agents can read, navigate, and reason over technical content effectively. Learn more at gitbook.com.
## Querying This Documentation
If you need additional information that is not directly available in this page, you can query the documentation dynamically by asking a question.
Perform an HTTP GET request on the current page URL with the `ask` query parameter, and the optional `goal` query parameter:
```
GET https://knowledgebase.autorabit.com/product-guides/vault/configuring-vault/registering-salesforce-org/setup-backup-configuration-for-salesforce-org.md?ask=&goal=
```
`ask` is the immediate question: it should be specific, self-contained, and written in natural language.
`goal` is optional and describes the broader end goal you are ultimately trying to accomplish on behalf of the user. GitBook uses it to tailor the answer towards what is most useful for that goal.
The response will contain a direct answer to the question and relevant excerpts and sources from the documentation.
Use this mechanism when the answer is not explicitly present in the current page, you need clarification or additional context, or you want to retrieve related documentation sections.